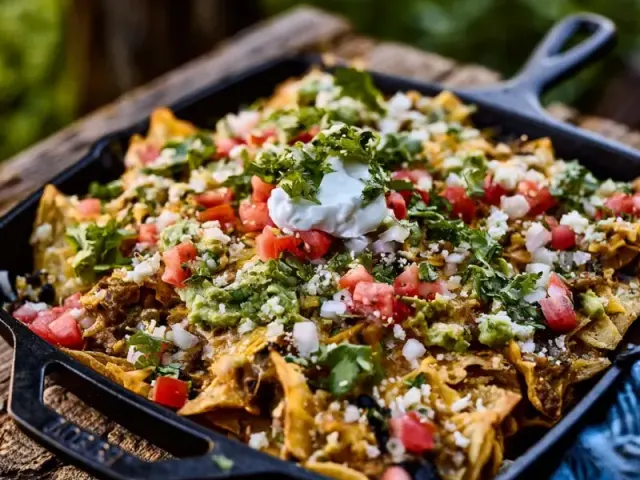
Campfire-Ready Cast Iron Skillet Nachos for Outdoor Cooking
There’s something about a cast iron skillet full of nachos, bubbling over a campfire, that just feels right. The cheese stretches, the chips hold their crunch, and everything comes together in one pan. No bowls, no plates, no fuss. But there’s a trick to getting it right over fire – you can’t just dump everything in and hope. The heat is uneven, the chips can burn, and sogginess is a real threat.

I’ve dialed in a method that works every time. It’s about layering, heat control, and one simple tool: heavy-duty foil. Here’s how to pull off campfire-ready cast iron skillet nachos that are crisp, cheesy, and fully cooked without a single burnt edge.
Why Cast Iron Works for Campfire Nachos
Cast iron holds heat evenly and retains it long after the fire dies down. That’s key for nachos – the chips need steady, moderate heat to warm through without scorching. A thin metal pan will give you hot spots. A cast iron skillet spreads the heat, so the cheese melts uniformly and the chips on the bottom don’t turn to charcoal.
I use a 10-inch skillet for four servings. Anything larger and the heat spreads too thin over a campfire grate. Smaller works for two, but you’ll need to adjust layers.
The Chip: Your Foundation
Not all chips are equal over fire. Thin, flimsy chips turn to mush the second they touch hot cheese. I reach for restaurant-style tortilla chips – the thick, sturdy ones that can hold up to a layer of beans and still crunch. If you can only find standard chips, double up the bottom layer and accept a slightly softer texture.
One 13-ounce bag is enough for two layers in a 10-inch skillet. Don’t cram them in. You want a single layer with a few broken pieces filling gaps, then a second layer on top. Two layers max – more than that and the bottom chips steam instead of toast.
Building the Layers (The Right Way)
Here’s the sequence I follow. It’s not complicated, but the order matters.
First layer: Chips, then half the cheese, then half the beans, jalapeños, tomatoes, and olives. Second layer: Chips again, then the remaining cheese, beans, and toppings. The top layer should be mostly cheese – that’s what melts into a golden blanket.
I drain the black beans and diced tomatoes well. Excess liquid is the number one cause of soggy nachos. Pat them dry with a paper towel if you’re feeling thorough.
For the cheese, pre-shredded blends work fine, but they contain anti-caking powders that can make the melt a little grainy. If you have time, shred your own block cheese. It melts smoother and clings to the chips better.
Heat Management Over Fire
This is where most people go wrong – they put the skillet directly into roaring flames. Don’t. You want medium-high heat, not inferno. On a campfire, that means letting the fire burn down to a bed of glowing coals. On a camp stove, set the burner to medium.
I test the heat by holding my hand 6 inches above the grate. If I can keep it there for 3-4 seconds, it’s ready. If I have to pull away after 2 seconds, the fire’s too hot – move the skillet to the edge of the grate or wait for the coals to cool.
Place the skillet on the grate or directly on a ring of coals. Let it preheat for 2 minutes before adding the chips. That initial heat helps the bottom layer start crisping immediately.
The Foil Trick
Covering the skillet with heavy-duty foil is the secret to even melting without burning the top. The foil traps heat and steam, which melts the cheese quickly. But you don’t want a tight seal – leave a small vent for steam to escape. Otherwise, the chips get soggy from trapped moisture.
Crimp the foil loosely around the edges. I leave a one-inch gap at one side for steam to exit. Cook for 8-10 minutes. At 8 minutes, lift the foil carefully (watch for steam) and check. The cheese should be fully melted and starting to bubble. If it’s not there yet, re-cover and give it 2 more minutes.
If the chips on the bottom start smelling burnt before the cheese melts, your fire is too hot. Slide the skillet to a cooler part of the grate immediately.
Finishing and Serving
Once the cheese is melted, remove the skillet from the heat using heat-resistant gloves or a thick pot holder. Let it rest for 2 minutes off the fire. This lets the cheese set slightly so it doesn’t slide off the chips when you serve.
Add cold toppings like sour cream and salsa right before serving. The contrast of cool, creamy sour cream against the hot, salty nachos is part of the magic. Serve straight from the skillet – and remind everyone that the handle is scorching hot. I wrap a bandana around the handle as a visual cue.
Common Mistakes and Fixes
Burnt chips: Fire too hot or skillet preheated too long. Start with a cooler fire and preheat only 2 minutes.
Soggy chips: Too many layers or wet toppings. Stick to two layers and drain everything well.
Uneven melting: Cheese not spread evenly or skillet not level on the grate. Shake the skillet gently to level the coals or grate.
Cheese not melting: Fire too cool or foil not trapping enough heat. Add a few more coals under the skillet and check the foil seal.
Takeaway
Cast iron skillet nachos over a campfire are simple, but they reward a little attention. Get the heat right, layer carefully, and use that foil vent. The result is a skillet full of crispy, cheesy, satisfying nachos that feel like a real camp dinner – not a compromise. And cleanup? Just wipe out the skillet with a paper towel. That’s the kind of camping meal I can get behind.
Frequently Asked Questions
Can I make these nachos on a camp stove instead of a fire?
Yes. Use a camp stove with a stable burner. Set the skillet over medium heat and follow the same instructions. You may need to reduce cook time by 1-2 minutes since camp stoves often run hotter than coals.
Why are my chips getting soggy?
Soggy chips usually come from too much moisture in the toppings or stacking too many layers. Drain beans and tomatoes well. Use a sturdy chip. And don’t overload the skillet – two layers max is my rule. The foil vent helps steam escape, which keeps chips crisper.
How do I know when the nachos are done?
The cheese should be fully melted and starting to bubble around the edges. Lift the foil carefully – if the top layer of cheese is glossy and melted, it’s ready. The chips on the bottom should be warm and slightly toasted, not blackened. Check at 8 minutes first.